


In 2019, it’s easier than ever before for anyone to start a blog and make it profitable.
This is true even if you aren’t tech savvy, don’t know how to code, or understand the first thing about web design.
With a little bit of guidance and a few basic resources, you can have your very own personal or professional blog up and running less than 30-minutes after you finish this article (but there’s no need to rush it).
I’ll hold you by the hand and walk you through every part of the process while helping you avoid the common mistakes that stop most new bloggers dead in their tracks.
Sound good?
Then let’s dive in and get started.l
P.S. If you’re curious about how much it will cost to start and maintain your blog, the simple answer is $0 to $60/year. I highly recommend that you opt for paid domains and hosting, but you have the option to start for free to test the waters.
Why Start a Blog? What’s In It For You?
When I first started this blog, my aims were simple.
I wanted to teach people how to navigate the tricky (and often less-than-ethical) world of blogging and web development.
With time, my site began to pickup steam, eventually attracting new clients for my company and giving me the opportunity to quit my day job and pursue blogging full time.
However, there are a myriad of different reasons that you might decide to start a blog beyond merely making enough money to hand in your two week’s notice.
For example:
- A consistent blogging habit will make you a better writer
- If you find the right niche you can make a full time passive income
- A high-traffic blog makes an excellent addition to your resume
- You have an opportunity to share you knowledge and expertise
- You can make important connections and grow your network
- And it’s FUN!
I could drone on and on about the benefits of blogging until the sun sets and the moon rises, but I think you get the idea.
The bottom line?
Blogging is awesome and it has the power to change your life.
Assuming you want to take the plunge and start your blog today, here are the exact step you need to take to get started.
Step 1: Decide – Create Free Blog or Self-Hosted Blog?
 As I mentioned in the introduction, starting and maintaining an average sized blog will cost between $0 and $60 a year.
So yes, you can start your blog for absolutely nothing, however–as with most things in life–just because you can doesn’t mean that you should.
Let me explain…
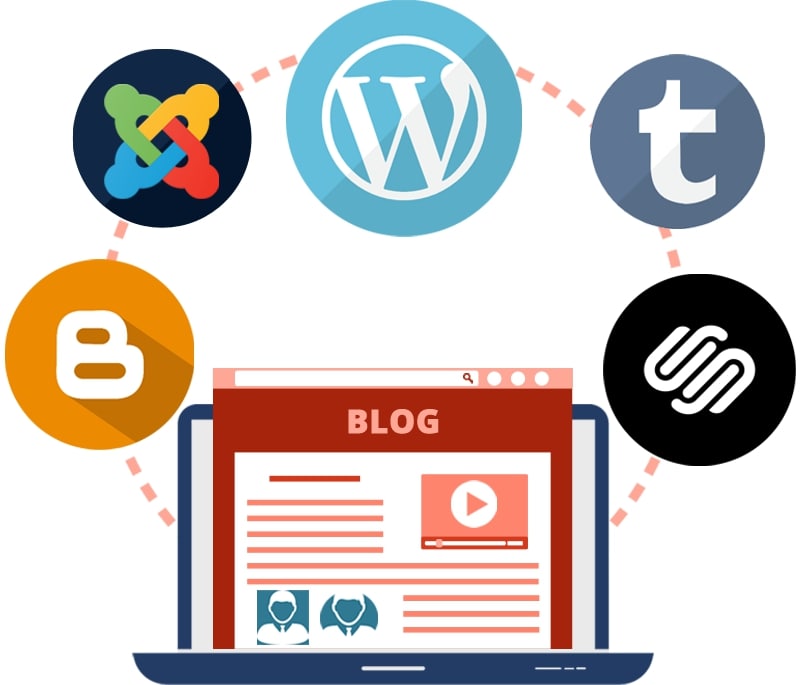
Yes, you can create a blog for free on many different platforms, such as:
But before you go smashing the above links and clicking “sign up”, read the rest of this section!
Sure, these platforms are great for testing the waters and solidifying some of the ideas you might have regarding content and design.
However, if you are serious about starting a profitable and successful blog, you should avoid these platforms at all costs.
Here’s why:
These “free” blogging platforms have crippling limitations and totalitarian authority over your content.
They are, first and foremost, businesses. And their
main only purpose is to turn a profit by using your website to sell ad space and placing enough limitations on your account that you are eventually forced into a “premium” or “unlimited” blog plan.
Plans that are, more often than not, wildly overpriced and woefully under-equipped.
Without their expensive upsells, your account will be limited to a paltry few–and very generic–number of designs from which to choose, a “maximum” number of daily visits, limited storage, and all but nonexistent customer service.
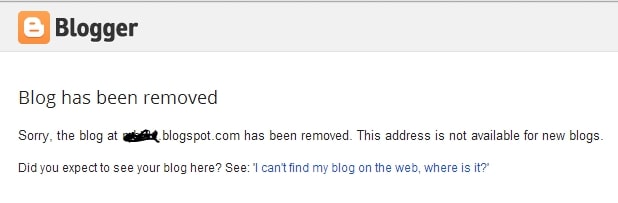
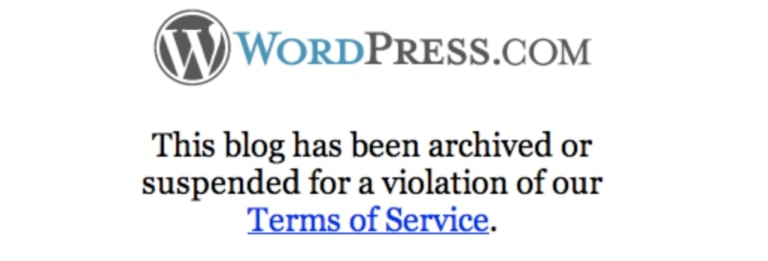
And let’s not forget that these platforms have total control over your content.
So if you post something that one of your friendly neighborhood website moderators doesn’t like, your entire site (and all of your data) can be deleted in an instant.
Just think about that for a second…
You spend months hustling and grinding to grow your blog. Slowly but surely you acquire a decent number of loyal visitors and subscribers. Then, the money starts to roll in, from sponsored posts, paid ads, or your own products.
Things are going great.
And then you accidentally violate your free web provider’s Terms of Service (see all limitations for Blogger.com and WordPress.com) and your entire online business is irrevocably lost to the trash bin of the interwebs.
Or
Do you really want to deal with this?
I hope not.
This is why all of the most successful bloggers started their own self-hosted blog.
It’s cheap, grants you access to your own personal domain name (e.g. myepicsite.com vs. myepicsite.blogging-platform.com), and you’ll have no limitations.
Oh, and you’ll also have access to premium website templates and design plugins to ensure that your new site looks like something created by a pro.
The bottom line?
Bite the bullet and fork over a little cash to get your blog started the right way.
A few months from now, you’ll be glad that you did.
Step 2: Get a Domain Name, Web Hosting & Setup Your Blog
Alright, with all of the anti-free-blog preamble out of the way, it’s time to get down to the good stuff and go through the exact steps that you need to follow to build and launch your self-hosted blog today.
To get started, you’ll only need two things:
- A Domain name – The web address of your blog (mine is www.websitesetup.org)
- Web hosting – A server to store your blog files and keep it online for others to browse and read at all times.
And with a few quick clicks you can purchase and setup both of these things as easy as 1… 2… 3…
1. Sign up with Web Hosting
Full disclosure: To keep my site up and running I use affiliate links for some of the products mentioned in this guide. This means that I earn a small commission (at no extra expense to you) anytime that you make a purchase using one of my links. Thank you for your continued support!
Of the countless web hosts on the market, only a small handful are even worth considering.
Of those, only 3-4 offer truly exceptional services for the price.
And of those, Bluehost is the only hosting service that I recommend to first-time bloggers.
The reason is simple.
Bluehost is cheap, fast, reliable, and armed to the teeth with a slew of free goodies that will streamline your blogging experience and make your life infinitely easier.
Not only do they power more than 2,000,000 websites worldwide, but all of their packages come with a 30-day money back guarantee, exceptional 24/7 live support, and a free SSL certificate (a $60+ bonus).
Oh, and they also offer one click installs, making it dead simple to get your blog launched in a matter of minutes.
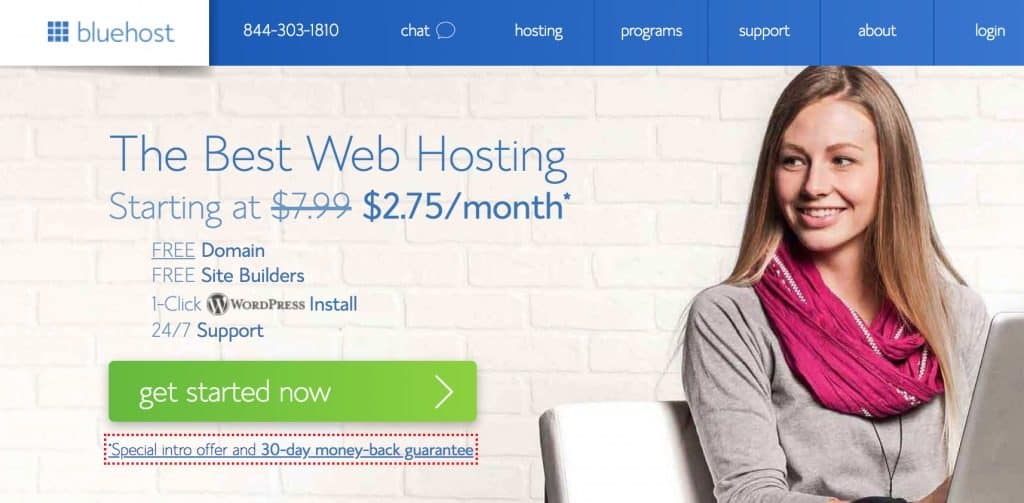
Simply click on the “Get Started Now” button and choose a domain name.
2. Choose a Domain Name
Unlike many of the more profit-centric web hosts that will charge you upwards of $14.99/year for a new domain, BlueHost gives new customers a free domain name for the entire first year of their web hosting service.
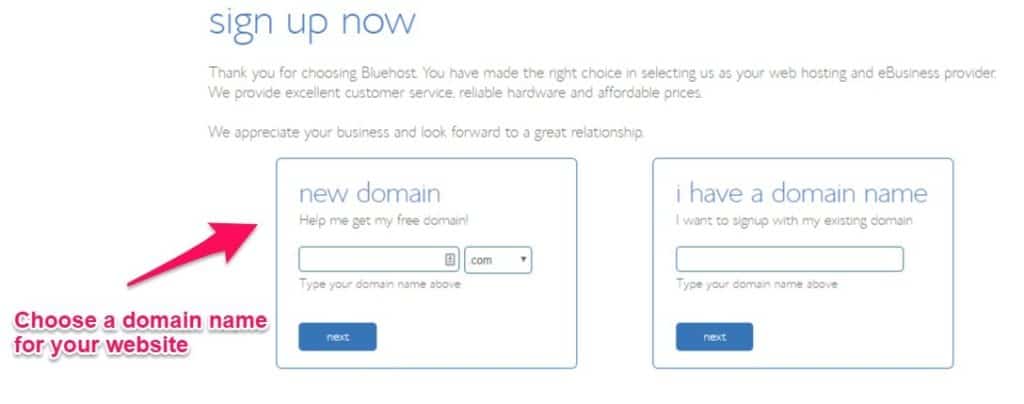
If you’re serious about building a strong online presence and visitors from all over the world you’ll want to get a domain name with a .com, .net, or .org, extension (here’s guide for choosing a domain name).
For those of you who are unable to claim your first choice of domain name, spend a few hours brainstorming ideas with friends and family. Think out loud and experiment with different words and variations to find the most brandable domain name for your new site.
3. Choose Web Hosting Plan and Finish Your Registration
Now that you’ve decided on your domain name, it’s time to select your web hosting plan, finish your registration, and begin your forays into the wonderful world of blogging.
As a general rule of thumb, I recommend that opt for BlueHosts’ ‘Prime’ plan since it comes with a free SSL certificate from “Lets Encrypt”.
This will keep your visitor’s information secure, improve your engagement (no one wants to spend time on a website plagued by a giant “Not Secure” warning), and earn you a few extra brownie points with Google.
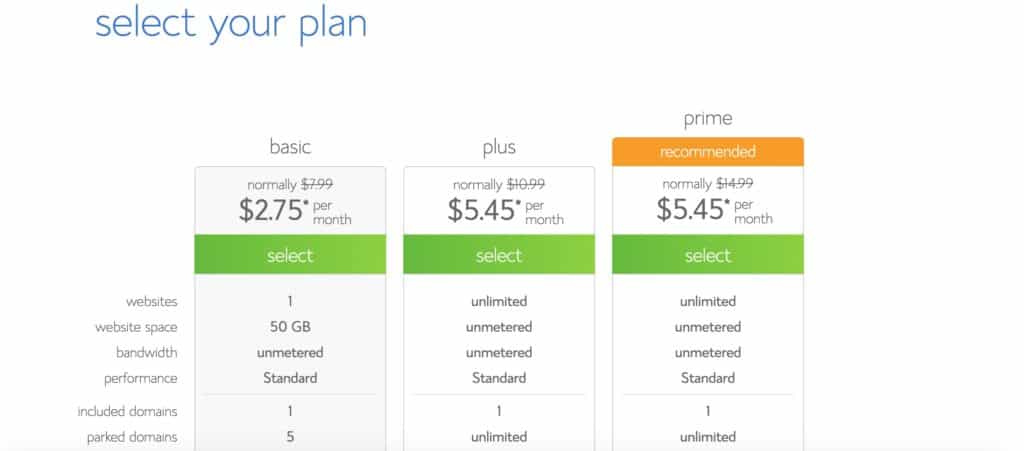
Since the renewal prices for BlueHost’s Prime plan are a bit pricier than their introductory rate, I recommend that you purchase as long of a subscription as possible to make your budget go as far as possible.
Once you’ve chosen the plan that best suits your needs you can finish off your registration and checkout using a credit card or PayPal.
And there you have it! You are now ready to launch your blog instantly (instead of waiting 2-3 days for activation like you would with many of their competitor’s).
4. Setup and Launch Your Blog
Once you’ve completed the registration process, it’s time to setup an admin panel (or cPanel) password–make sure it’s as strong as possible to keep hackers at bay–and login to your Bluehost admin panel via my.bluehost.com.
Once you are there, you should be able to see this screen:
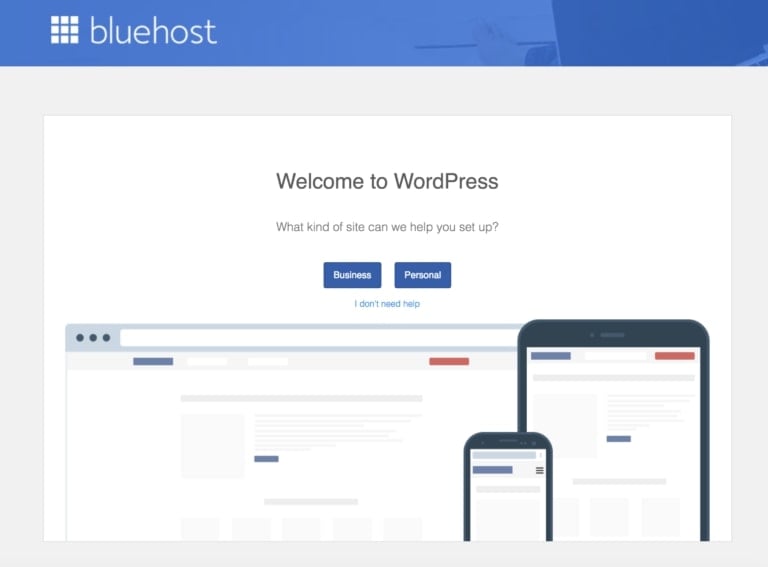
Congratulations! If you see this, it means that your blog is already setup.
However, there are a few things that I’d recommend you do to ensure that it’s visible as soon as possible…
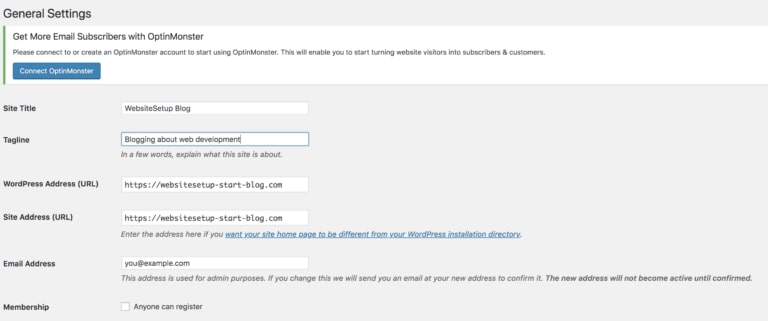
- Go to Settings > General (left sidebar)
- Add Site Title and Tagline (your blog name and tagline)
- Change your site address to your domain name. In my case, I’m using websitesetup-start-blog.com
- Add your email address (so you can reset your password later)
Once you’ve completed this, launch your blog by clicking “Coming Soon Active” at the top of WordPress dashboard and then “Launch Your Site”:
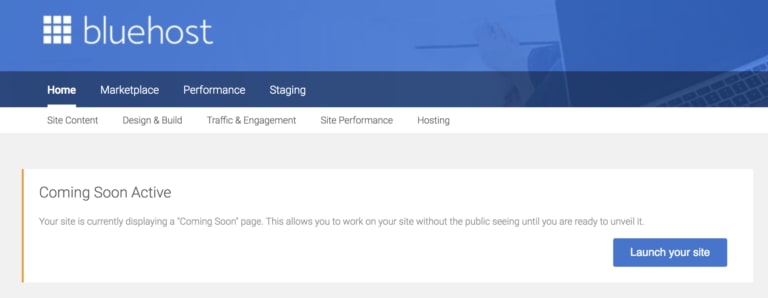
Now that you’ve launched your blog, you’ll be able to see–what can only be described as–a skeleton of a website.
And this is where it gets fun.
With your domain name, web hosting, and blog setup, it’s time to get down and dirty and start customizing the aesthetic of your website.
Step 3: Design Your Blog – Make it Look Awesome!
The fastest and easiest way to customize your blog and make it look absolutely awesome is to use the free themes provided by WordPress’ theme library.
1. Choose a Theme and Layout You Like
To install a new theme, go to your website’s dashboard, then go to Appearance > Themes, then click Add New from the top.
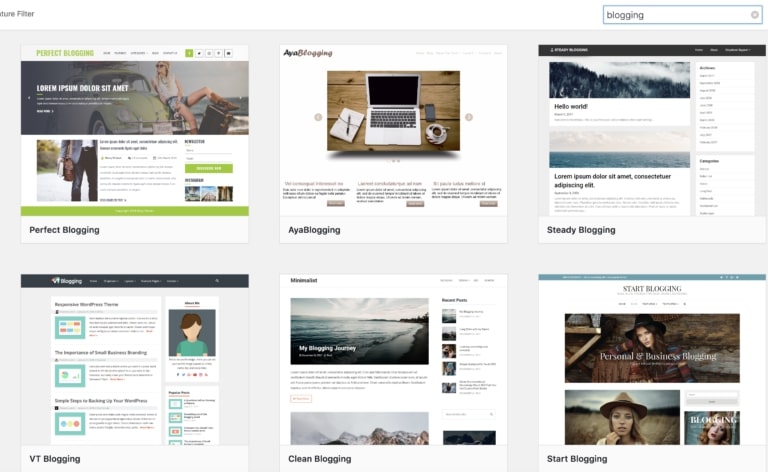
From the search results you can test out each theme to see how you like it by clicking on “Live Preview”.
Once you find the perfect theme for your new blog, you can activate it from either the Live Preview (just click “Activate the Theme) or from the main search area by clicking the “Activate” button.
As soon as the theme is activated, it will be installed on your site and you’re now ready to start posting viral content and generating raving fans.
P.S. If you don’t know which theme to choose, I’ve compiled a list of most popular WordPress themes.
2. Manage Your Blog’s Content (Blog Posts & Pages)
When you’re first getting started your site will be adorned with little more than the default “Hello World” post.
To add your first post navigate to Dashboard > Posts > Add New.
From here, you can add the title and start writing amazing content for your new blog.
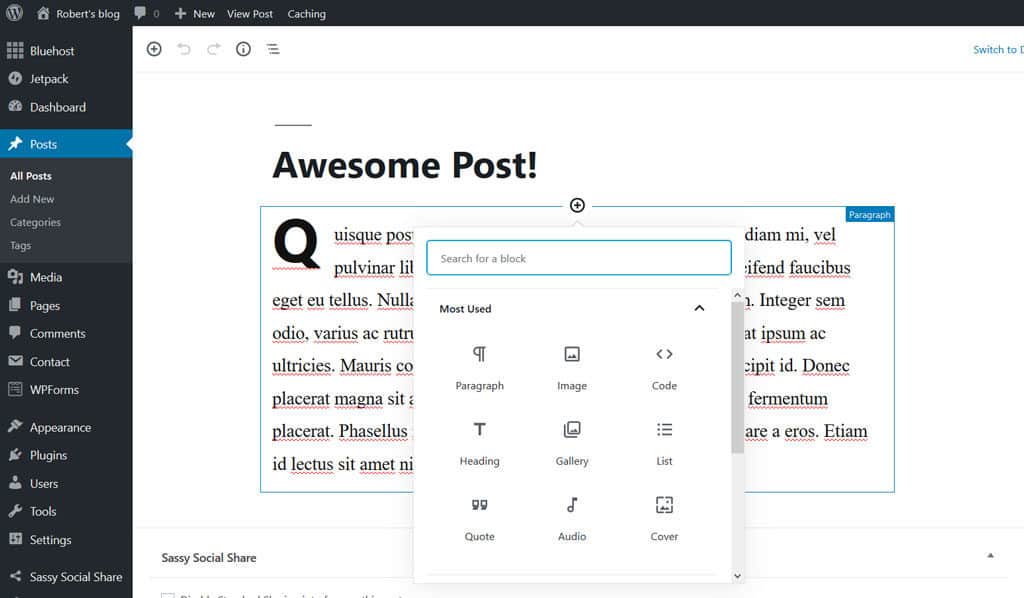
With the new Gutenberg editor, you can add different types of content blocks into the editor by clicking on the “Add Block” icon.
Since I don’t have the time to cover every type of block included in the new editor (there are quite a few of them), I implore you to try it for yourself as most–if not all–of them are self explanatory.
Next, you’ll want to add a featured image to spruce up your post and add some visual flair for your readers. To do this, simply click the “Featured Image” box on the right hand side of your screen, upload your image, and click “Save”.
Once you’re satisfied with the quality and layout of your post, hit the publish button, sit back, and prepare to take the blogging world by swarm.
You have officially published your first post!
If you want to add a welcome page on the homepage of your site instead of a list of recent blog posts,all you need to do is go to Pages > Add New and then add the title and content.
Then rinse and repeat this process to create another page for your blog list, choose an appropriate title (like “blog” for example), and then hit publish.
With both pages created, go to Dashboard > Settings > Reading, then in the “Your Homepage Displays” option, check “A static page”, select your welcome page in the “Homepage” setting and your blog page in the “Posts page” setting, then hit save.
Your welcome page will now be published and ready to greet your new visitors as they arrive.
3. Create a Menu
One of the most important aspects of good user experience on any new blog is navigability, a.k.a. the ease with which your new viewers can find the content for which they’re searching.
And the most important part of navigability is a well designed and up to date menu.
Luckily, creating a menu inside of WordPress is pretty straightforward.
To get started, simply go to Dashboard > Appearance > Menu.
From here, create and add a new title for your main menu and then–in the left pane of the menu editor–check the pages you want to appear on your new menu and click “Add Menu”.
The checked pages should appear on the right pane of the editor and you can now rearrange their order by dragging the labels up and down.
Once you’re happy with your menu’s structure, you can display it on your website’s main header by checking the “Primary” location checkbox (the name depends on the theme you previously selected) in the menu settings and hit save.
4. Install Plugins (They’re Free)
Plugins are one of the simplest (and cheapest) ways to extend your website’s functionality and increase the traffic and profits you generate each month.
Luckily, there are (quite literally) thousands of free plugins and libraries inside of WordPress and countless more on other external sites.
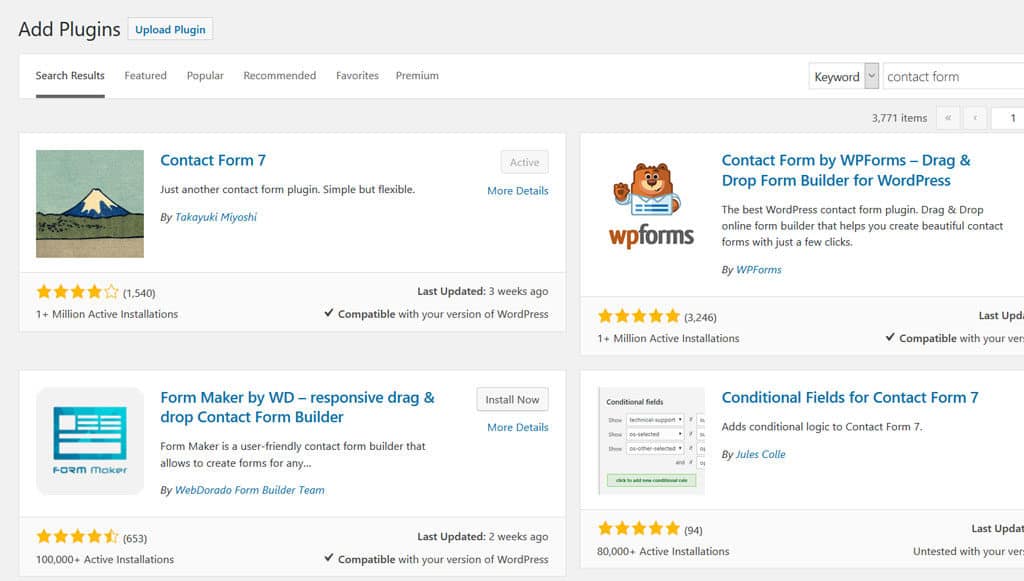
Let me give you a quick example with one of the most important plugins that you can download for your new site… A contact form.
First, you’re going to go to Dashboard > Plugins > Add new and search for “Contact Form 7.” Then, click “Install” and activate the plugin from the search results.
Once the new plugin is activated, it will create a new menu called “Contact” in the dashboard. Click it to access the contact forms generated by the plugin and then click “Contact Form 1” from the list to edit the new form.
At this point, the contact form is effectively up and running, however, you’ll want to make sure that the mail template is properly functioning so that you actually receive emails sent from the form.
To do this, go to the “Mail” tab and change the “To” value to the address where the email should be sent.
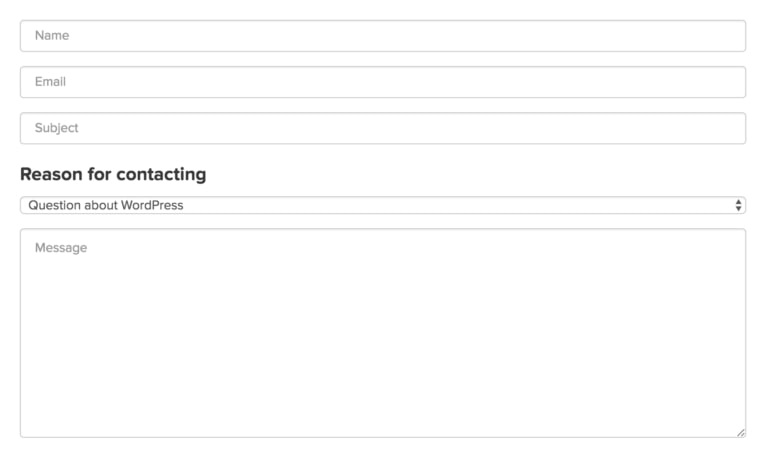
Next, you’ll need to copy the “shortcode” found just under the contact form’s name… It should look something like [contactform-7 id=”25″ title=”Contact form 1″].
After you have copied the shortcode, create a new page called “Contact Us,” and simply paste the shortcode in the content.
Then click “Publish”, sit back, relax, and check out your new content form in all of its glory:
If you are looking for more plugins that will improve the use and functionality of your blog, here’s a list of best plugins.
5. Customize Your Blog
To really add another level of flair and personalization, you’ll want to download another plugin that will allow you to change your website’s fonts.
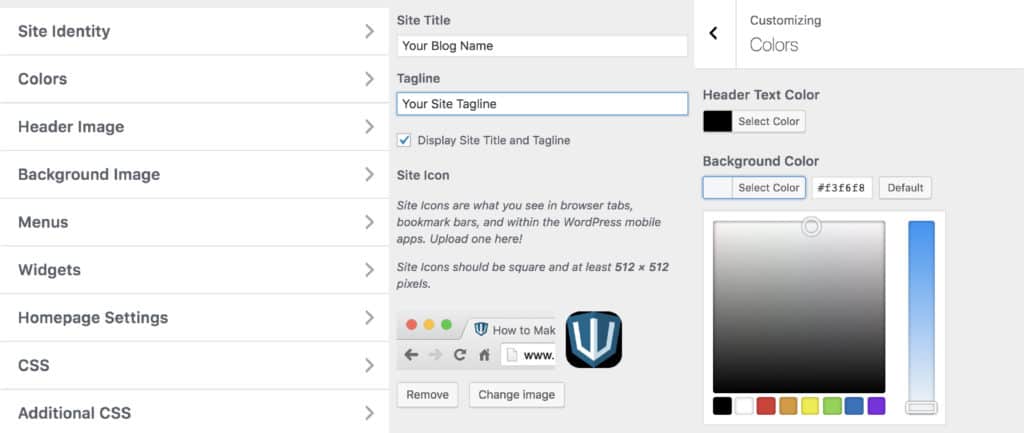
Repeat the same steps listed above for the plugin “Easy Google Fonts” and then go to the theme customizer.
The customizer gives you the ability–much as the name would suggest–to customize your theme and preview it in real time.
Whether you want to change your site identity, colors, menus, widgets, homepage settings, or additional CSS, the customizer gives you almost total control over your website’s design.
With Easy Google Fonts installed, you’ll notice that there is a new option in the Customizer: Typography.
This setting allows you to change the fonts on your site to your liking and grants you a greater level of authority over your site’s aesthetic.
I encourage you to spend some time playing around with the Customizer until you have a strong grasp of the options available to you. Then, once you’re happy with the new look of your site, click “Publish” (as always) and double check the changes in a new tab.
To make it easier for your readers to share your articles on their favorite social media channels, you’ll also want to install a social sharing plugin that will allow your viewers to seamlessly promote your new content from your posts and pages.
Just do a quick search in the plugins page with the keyword “social share” and you’ll be presented with hundreds of results. Install any plugin that strikes your fancy and set it up by going to its settings in your dashboard.
If you want to further customize your blog, read this WordPress Customization Guide.
6. Create a Personal Email Account
Having a domain-based email account like yourname@yourdomain.com boosts the professionalism of your website and increases the authority with which your correspondents will view you.
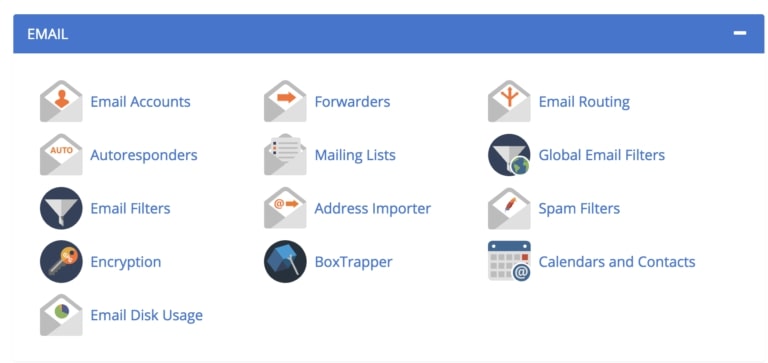
Luckily, BlueHost includes the ability to create a custom email account from your domain as a part of your web host account.
To access this feature, simply login to your BlueHost portal, click “Email & Office” in the left menu, scroll down and find “Basic Email”, and then click “See Options”.
From here, you can create your custom account in a matter of seconds.
Once your email account is created, click Email Accounts > Access Webmail to access the webmail application.
After confirming your credentials, you’ll be off to the races and you can now manage, send, and receive emails from your new domain-based account.
I’d encourage you to create an “About” page and add your new contact information so that all emails sent on your new site will be sent to the account you just created.
If you get stuck, here’s a guide for creating a custom email address for your blog.
Congratulations, You’ve Made It
Phew!
That wasn’t so difficult, was it?
At this point, you should have your very own fully functioning blog up and running.
But this is just the beginning.
Use the other content on my website to take your new blog to the next level and be sure to take few days to learn all the ins and outs of your new WordPress blog.
- How to Customize WordPress Blog (the basics)
- Guide to Getting Visitors to Your Blog
- 33 Ways to Monetize Your Blog
- 2019’s Best WordPress Themes
- 2019’s Most Popular WordPress Plugins
- How to Add Email Newsletter to Your Blog
If you get stuck, don’t hesitate to email me and I’ll do my best to help you out.
P.S. If you liked the guide, please don’t hesitate to share it on Twitter or Facebook.
No comments:
Post a Comment